

How to Trim Brisket: A Clear Guide for Home Cooks
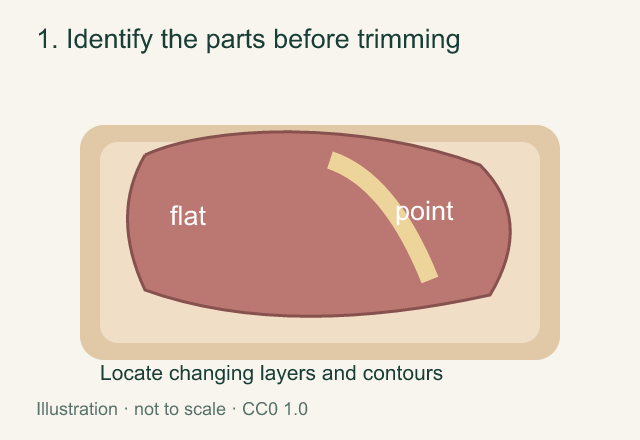
To trim brisket, identify the flat, point, fat layers, and exposed membranes before removing anything. Work with refrigerated meat on a stable board, use small controlled cuts, and reassess the exposed surface as you go. The goal is a deliberate, reasonably even preparation for your cooking method, not the removal of every visible bit of fat.
This guide covers trimming a raw brisket for a home kitchen. Slicing the cooked meat is a separate process explained in how to slice brisket against the grain. The illustrations below show simplified concepts; the exact position of fat and muscle varies with the cut.
What Are You Trimming, and Why?
A whole packer brisket includes the flatter, leaner-looking flat and the thicker point, with fat between and around the muscles. One broad surface may carry a substantial fat cap. Other areas can have firm exterior fat, exposed membranes, or irregular edges. These features are not identical, so decide what each cut is intended to accomplish.
Removing a large hard protrusion is different from thinning an uneven cap or dealing with a thin membrane. Pause before cutting if you cannot distinguish the tissue from the meat beneath it. Small exploratory cuts give you more information than taking off a broad layer at once.
Competition presentation, a particular smoker setup, and a simple home-cooked brisket may call for different preparation. Follow the needs of the recipe you are actually using. A squared-off competition outline is not a universal requirement, and an uneven natural shape does not by itself mean the brisket needs aggressive trimming.
Set Up the Knife and Work Area
- Use a stable board large enough to support the brisket and keep the working area clear.
- Keep the meat refrigerated until you are ready to work. Return it to refrigeration if preparation pauses.
- Choose a suitable trimming or boning knife with a working point you can control. The SYOKAMI 6.7-inch Boning Knife is a current meat-preparation option; follow its own guidance.
- Set out a separate place for trimmings and manage packaging and juices without mixing them into ready-to-eat preparation.
- Start with clean, dry hands and keep the supporting hand away from the cutting path.
The USDA cutting-board guidance explains separation and cleaning for raw meat and other foods. A good knife choice does not replace that routine. Clear and clean the work area appropriately when preparation is finished.
Identify the Flat, Point, and Fat Layers

Look at both sides before you start. Notice the broad flat, the thicker overlapping portion, and any obvious seams. Look for substantial hard fat, a very uneven surface layer, and any exposed silverskin. Also notice areas where the meat is already thin; they are easy to over-trim.
If the grain is visible in an area, note its direction for later serving. A reference photo of your own cut can help, but you will still need to recheck the cooked meat because the flat and point can run in different directions. Do not assume one remembered angle will suit every part.
Trim the Brisket Step by Step
1. Inspect Before Removing Large Pieces
Place the brisket securely and choose the first obvious area that needs attention. Keep the rest of the surface intact until you have a clear plan. If you are new to the cut, start with a small amount of a clearly identified exterior protrusion instead of immediately reshaping the whole brisket.
2. Address Hard Exterior Fat

Where firm exterior fat projects from the surface, work around its edge in shallow cuts. Remove manageable pieces and inspect what remains. Keep the blade’s path visible. If the fat runs into a seam between muscles, do not follow it deeply simply because it continues out of view.
Stop when the planned exterior trim is complete. A seam is part of the cut’s structure; hollowing it out can remove more than you intended. You can make another small cut after inspecting the surface, but you cannot put removed meat back.
3. Even Thick Patches in the Fat Layer

Work across an unusually thick patch gradually. Rather than taking one deep slice, shave off a small amount and compare it with the surrounding area. If your cooking method calls for leaving a fat layer, aim for a reasonably even result instead of stripping the surface bare.
There is no single thickness that is correct for every brisket, recipe, and cooking arrangement. Use the target appropriate to your method and the actual cut. It is better to stop and reassess than to chase a measurement into a thin or irregular section of meat.
4. Deal with Exposed Silverskin Carefully

Where a membrane can be clearly identified, begin with a small visible opening at its edge. Keep the approach shallow and check how much tissue is being removed. Avoid burying the point under a large area that you cannot see. If meat is coming away with the membrane, pause and change the route.
Do not try to remove every pale or shiny patch by appearance alone. Fat, membranes, connective tissue, and reflections can look similar at a glance. The safe next step when you are uncertain is inspection and a smaller cut, not a deeper one.
5. Reposition and Inspect Irregular Edges

Turn the meat as needed so you can see the next area. Check thin flaps or very ragged edges in the context of your recipe, but do not remove sound meat merely to make the outline symmetrical. The useful cooking portion matters more than a perfect shape on the board.
Keep supporting fingers behind the cutting path. If the angle becomes awkward, move the food rather than reaching around it with the knife. Short, visible cuts remain the priority as the contour changes.
6. Check Both Sides and Stop

Look over the exposed surfaces, edges, and remaining fat layer. Confirm that you have addressed the areas you planned and have not created unnecessary gouges. Leave the cut in a condition that suits your recipe, then return it to an appropriate refrigerated holding routine until the next preparation stage.
Common Trimming Mistakes
| Problem | What to change |
|---|---|
| Meat comes away with every trim | Pause, expose the boundary, and take a smaller, shallower cut |
| You keep chasing fat deep into a seam | Reassess whether separation is actually part of your cooking plan |
| The surface becomes deeply uneven | Stop reshaping it and inspect before removing more |
| The knife catches or requires force | Check the tissue, angle, tool suitability, and edge condition |
| The brisket keeps moving | Improve the support and position before continuing |
Blade shape does not solve every issue in this table. If you are still selecting a tool, compare curved and straight boning profiles and use the meat-cutting knife guide to distinguish raw trimming from cooked slicing.
What Comes Next?
Continue with the seasoning, holding, and cooking instructions for your chosen method. This trimming guide does not prescribe a full smoking schedule. Once the brisket is cooked, choose a suitable slicing tool and find the grain again before portioning it. A successful raw trim and a successful cooked slice are different parts of the meal.
For another worked example of the cut’s structure, see Jeff Phillips’s brisket-trimming guide. Its discussion includes point-and-flat separation; whether to separate them should still follow your own cooking plan.
Frequently Asked Questions
Should I remove all the fat?
No universal rule calls for removing every bit of fat. Identify hard exterior patches and uneven areas, then trim according to your recipe and the cut. Avoid removing sound meat to pursue a perfectly uniform appearance.
Must I separate the point and flat before cooking?
Not necessarily. Some methods keep the whole packer together; others separate portions for a specific cooking plan. Do not dig through a seam simply because a trimming example uses a different method.
What if I start removing too much meat?
Stop, inspect the exposed boundary, and improve the angle and cut size. Reposition the brisket if needed. Continuing with the same deep cut will not restore what has already been removed.